Since the existence of humankind, drawing has always been a form of art that acts as a means of self-expression using creative skills to appreciate their surroundings. Embracing a new skill is a journey, and looking at a bonsai tree drawing as a beginner who has little experience with drawing might look intimidating. The good news is that once you set your mind to it and follow the right approach, anyone can bonsai trees. The decorative plant’s beauty can effortlessly please one’s sight while helping in developing skills like drawing intricacies and textures because of the elegant branches of the tree and its unique structure.
In order to follow through, we will provide a precise and structured approach to the intricacies involved in drawing a bonsai tree and will ensure that you can perfect the art of drawing bonsai trees through an elaborate step-by-step guided process, whether you are a novice or a seasoned beginner looking to polish up your art skill. The drawings will help familiarize you with the fine details and offer a flavor of sophistication of the noble art. In the quest to convey profound knowledge, insightful suggestions will be blended with discussion around the deep meanings articulated by the bonsai tree symbol.
What Is A Bonsai Tree?
To delve deeper into the art of drawing, we need to understand what exactly a bonsai tree is. Originating from Japan, a bonsai tree is a fully matured tree whose pot size is a miniature replica of its original size. The tree’s physiological features can be obtained through pruning as well as shaping by hand or the use of scissors. Symbols of harmony, patience, and balance in Japan, bonsai trees have captured the attention and interest of people regardless of their occupation due to their art, which has spread around the globe.
Characteristics of A Bonsai Tree
- Miniature Size: A bonsai tree is a fully developed tree that has been scaled down to fit within a pot, but it still retains the shape and features of a large tree.
- Intricate Branching: One of the most distinctive features of a bonsai tree is its complex branching, which is the most euphemistic expression of plant pluralism and hybrid inferiority complex.
- Gnarled Trunk: The trunk of a bonsai tree is normally aged and traced with visible features and texture on it, which may not only appear gnarled but can totally look and behave naturally.
- Leaves and Foliage: While small in size, the leaves tend to be detailed, and some species of bonsai trees can bloom and bear fruits or flowers.
The craftsmanship’s reward is impressive, and it’s an invitation for all of us to practice effortlessly your already existing skills such as drawing, creativity, and most importantly, your imagination, all while capturing the symbolic beauty of this stunning tree!
Why Draw a Bonsai Tree?
Capturing the essence of a bonsai tree in a drawing is one of the most fulfilling forms of art. A bonsai tree is also an amazing subject for learning to capture details like depth, texture, as well as natural forms. Here are some specific pointers that make bonsai trees great for novices learning how to draw:
- Improves Patience: Drawing any subject, bonsai trees included, requires a significant amount of patience and detail, especially if one wishes to achieve perfection.
- Enhances Observation Skills: The observation of the unique features that bonsai trees possess, such as gnarled branches and compact shapes, provides excellent opportunities that can greatly improve observation skills.
- Relaxing and Therapeutic: Ultimately, bonsai drawing enables sculpting from scratch, steering one’s focus toward art; something beautiful that you create from scratch.
After gaining some knowledge on what a bonsai tree is and what makes it a great subject to draw, let’s delve into the process.
Begin to Finish Guidance on Drawing Bonsai Trees
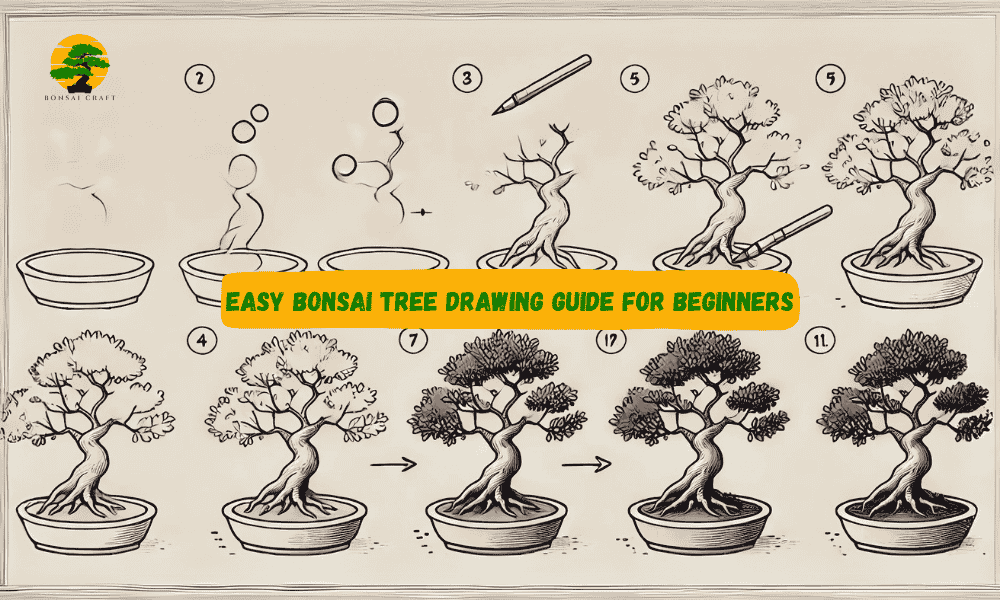
When it comes to drawing bonsai trees, there are simple steps that, when followed sequentially, can help and aid you in achieving the perfect illustration. With a little practice and basic tools, you will easily be able to illustrate beautiful bonsai trees. Here’s how to get started:
Step 1: Gather Your Materials
Before embarking upon the beautiful journey of drawing a bonsai tree, make sure you have these materials:
- Pencil: A good quality pencil (roughly 2B or 4B) will allow you to achieve light guidelines as well as dark detailed lines with ease.
- Eraser: An eraser will come in handy when you need to make adjustments or corrections.
- Paper: A smooth drawing paper will come in handy when doing fine lines as it is ideal.
- Colored Pencils or Markers (optional): These can be used to add to your final bonsai tree drawing.
- Ruler (optional): When drawing the pot, use the ruler if you want a perfectly straight line.
Step 2: Begin Drawing Basic Shapes (The Framework)
In this step, begin by sketching the outer lines of the bonsai tree. Use pencil strokes to lightly outline the trunk and branches.
- Trunk: Draw a thin and narrow trunk that slowly increases in elevation from the base. Bonsai trees typically have gnarled-looking trunks, so you can also make the trunk a bit spiral or rotated.
- Branches: From the trunk, begin by sketching a few branches going outwards. Make some of them curved so that they emanate from the trunk, then smaller branches from the bigger ones. These branches will need careful attention in order to achieve balance and a realistic look in your bonsai tree drawing.
Step 3: Add Realistic Touches To The Trunk and Branches
At this level, begin adding details such as textures to the trunk and branches to make them more lifelike. This step is very important for the bonsai tree drawing in question to achieve the natural aged look.
- Bark Texture: Use short and parallel curved lines to the sides of the trunk to add texture. You can give it a light shade to show the gnarled character of the tree’s bark.
- Branch Detailing: Use thin straight lines to represent smaller branches and twigs to the other main branches. Note that bonsai trees are known for their irregular shapes, so do not make the branches symmetrical.
Step 4: Sketch the Leaves and Foliage of the Bonsai Tree
At this point, you can focus on the leaves and the foliage, as this is the most integral part of your bonsai tree drawing.
- General Shape: Draw tiny, misshapen forms for the leaves. If you want the leaves to be green or you want the classic cherry blossom bonsai tree drawing, be sure the leaves are grouped at the tips of the branches. If you’re sketching a cherry blossom bonsai tree, you can dip pink to give an indication of the flowers.
- Layering: Bonsai trees are often layered, so overlapping strokes suggest the depth in the foliage. Try to draw the leaves that are in the center of the tree slightly bigger than the rest. The leaves beyond that can be smaller.
- Shading: The layering adds a portion of volume to make the drawing more realistic, while the shading brings a beautiful polish, making it stunningly captivating. Shading leaves makes them appear full, so use light, soft shading, but do remember that with flat shading, depth remains and volume does not.
Step 5: Add the Pot and Final Descriptions
A bonsai tree without a pot does not make a bonsai tree, so draw in a suspended simple cylindrical pot below the trunk. For more realism, I suggest sketching slight textures depicting the ceramic material of the pot.
For further sophistication, I suggest subtle detail around the top of the pot to give it depth. In addition to the detailed sculpted parts, some texture can be added at the base to give the effect that the pot is placed on some surface.
Step 6: Adding Detail and Color
Now, look closer at the inline drawing. This is where you finish outlining the bonsai tree’s branches and put some extra shading on the leaves and trunk to make it look more realistic.
- Trunk and Branches Shading: The smaller of the two pencils is best for this task. A 6B or higher will work well since it puts out softer lead. You will want to concentrate on the parts of the trunk that sit below the branch and to the side of the trunk.
- Leaf Detail: For those with markers or colored pencils, you can create a depth illusion with the leaves. The back ones can be colored darker, and that will create the illusion of depth behind them.
Additional Advice on Bonsai Tree Drawings
- Look for Local Bonsai Tree Gardens: With luck, you can go to a local bonsai garden and take a closer look at how detailed a real bonsai tree is. If not, try looking for photos on the web.
- Start with Basic Layering: It can be easier and more efficient to begin with a lighter sketch and then move to darker, more defined lines that require more detail.
- Rotate Position When Practicing: Try different angles when shaping the branches. Maybe bring some of them lower or bend them at different angles.
The Benefits of Bonsai Tree Sketching for Newbies
A beginner bonsai tree drawing is a great start for newcomers because it includes basic drawing practices like shading, texturing, and outlining shapes. Here are a few of the main benefits it offers:
- Basic Shapes: The overall structure of a bonsai tree is built around basic shapes, making it easier for beginners to handle.
- Authentic Shape: Bonsai trees have an authentic shape. Therefore, they can be drawn without being rationally symmetrical, which will give you more flexibility in drawing.
- Helps Improve Shading Skills: Since bonsai trees have a lot of different textures, they provide a great curve to learn the techniques of light and shadow.
Common Questions Answered
1. What is the best way to approach drawing a bonsai tree for the first time?
Start with the big outlines of the basic shapes like the trunk and other parts. Gradually, you can add more detail. It is best to begin by making light pencil marks and over time increase the amount of shading and texture you use.
2. What tools do I require to draw a bonsai tree?
You will need a decent drawing pencil (preferably 2B or 4B), an eraser, and a smooth piece of drawing paper. You can also use colored pencils or markers to add color.
3. Is it possible for me to illustrate a bonsai tree using colored pencils?
Of course! If you want to realistically depict the leaves or cherry blossoms, colored pencils would be an invaluable addition.
4. How much time do I need to set aside to draw a bonsai tree?
It differs from person to person, but with a little practice, a beginner should be able to master the art of bonsai tree drawings in a couple of hours. A more seasoned individual would take around 2-4 hours.
5. What makes a bonsai tree especially well-suited for novices?
Beginners can greatly master the various techniques of drawing with a bonsai tree due to the natural shapes it possesses.
Conclusion
Bonsai tree drawing tree captures the unique ability of nature and transforms it into art, which is an enriching experience. This guide is perfect for a beginner, as it breaks down everything step by step and provides tools, along with techniques to hone skills. With dedicated practice, one can appreciate the beauty of a bonsai tree in its full glory. Grab your pencil, and let your imagination run wild. The world is your oyster, or in this case, a peaceful, nature-inspired masterpiece waiting to come to life!